Showing posts with label DIY. Show all posts

Tuesday, January 5, 2016

Five Reasons Why You Need Honey in Your Skin Care Products

Honey, the elixir of the Gods. A pure and natural sweetener produced by Honey Bees for thousands of years, desired and consumed by mankind throughout the span of time.
Sounds a bit like magic? Well, in some ways it is. Just the very act of a colony of bees producing this golden elixir is in many ways, magical.

Did you know that in the span of a Honey Bee’s lifetime, she will only produce 1/12 of a teaspoon of honey? And that a colony of bees will visit over 2 million trees and flowers and fly over 55,000 miles in order to produce just one pound of honey? Considering the circumference of the earth is about 25,000 miles, it’s no wonder the Honey Bee is considered the most industrious insect on the planet.

We all know the benefits of raw honey when taken internally. Raw honey has been touted to alleviate allergy symptoms, GERD (Gastric Reflux Disease) and used in the treatment of ulcers. When broken down, this complex balance of both fructose and sucrose promotes better athletic performance and a restful night’s sleep.

Bees making Honey

But have you ever considered the effects of honey when applied externally? I think many of us instinctively feel the addition of honey in many of our skin care products on the market today is the safer and more natural alternative. I would love to share with you the reasons why honey and in particular Active Manuka Honey found in the Bee Queen line of skin care lotions is beneficial to your skin.
  • Your skin is the largest organ on the human body. The average adult body carries over eight pounds of skin which converts to about 22 square feet. It stands to reason that we should treat it with the utmost care. It is our first line of defense against harmful pathogens and easily the first damaged from external intrusions. Over exposure to harmful UVA/UVB rays, toxins both internal and external can lead to premature aging and wrinkling. The skin care industry is a 43 billion dollar revenue producer in the United States alone. And yet most of us cannot recognize or pronounce the ingredient list on the back of our skin care products. Doesn’t it stand to reason, that a simple and understandable ingredient deck can be a positive step in the care of this miraculous organ. In the Bee Queen formulations each ingredient is chosen to achieve a specific result to ultimately benefit your skin. For example, the Bee Queen Manuka Honey Lotion has four types of easily recognizable oils.
    • Organic sunflower oil-chosen as a carrier to incorporate honey without grittiness
    • Organic olive oil-adds amino acids and aids in skin repair
    • Organic apricot kernel oil-aids in skin repair
    • Organic meadow foam oil-adds slide. The reason why Bee Queen Manuka Honey Lotion feels so good on your skin.
  • Honey is a powerful antioxidant. Antioxidants combat and reverse the damage of free-radicals in our systems. A free-radical is a rogue molecule produced when the process of oxidation occurs. Free radicals are cells missing a key ingredient that allows for normal healing and repair. In simpler terms, think of the effect of peeling an apple. Once the protective skin is removed, oxidation causes the apple to become brown, shrivel and eventually rot. Over time our skin is assaulted by a variety of toxic substances. The harmful effects of UVA/UVB rays, environmental toxins such as pollution and cigarette smoke and poor nutrition can trigger the body’s natural production of antioxidants. But over time, these damaged cells overwhelms the body’s natural antioxidants effects resulting in the signs of premature aging, wrinkles and skin discoloration. Doesn’t it make sense to strengthen our skin’s defensive barrier with the application of a powerful, natural antioxidant? Raw honey in our skin care regimen can counteract the effects of these day to day stressors. They can promote the growth of new tissue and eradicate the effect of free radicals.
  • Raw honey is a natural humectant. A humectant is an agent that attracts and retains moisture by locking it inside. In contrast, many skin care products contain glycerin. Glycerin is commonly used as a moisturizing agent. But glycerin, a byproduct of vegetable oil is refined propylene alcohol, a drying agent to your skin. Humectants trap moisture providing a barrier, glycerin absorbs moisture.
  • Raw honey promotes wound healing. The antimicrobial effects of honey are well known. All honey contain properties when broken down form hydrogen peroxide, a powerful antibacterial. In addition, Manuka honey contains an enzyme named Methglyoxal, a germicidal agent 200x’s more powerful than hydrogen peroxide. This enzyme is specific to honey produced by bees who pollinate the Manuka flower found primarily in New Zealand and is closely regulated and rated for its quality control. This is the reason why we have chosen to incorporate Active Manuka honey into the Bee Queen
  • Honey provides UV protection and is an anti-irritant. It is gentle enough to use on sensitive skin and powerful enough to combat the effects of acne and scarring.
As you can see, I am passionate about the benefits of honey and encourage you to incorporate honey into your skin care regimen.  With all the positive benefits, why would you use anything less?

DIY Makeup Brush Holder

This post is about making a brush holder out of… a mug! I got the idea watching Pursebuzz‘s video on a cute, pink, over-sized cup with attached saucer made out of iron. It was very big though, so she had to put a smaller cup in the middle with the actual brushes in it. It looks like it’s an outside decor item but it’s very creative to use it that way!

So I came up with an idea that would be perfect to add to the two gifts I was giving to my sister and boyfriend’s sister (who’s birthdays were coming up). I had bought my bf’s sister a bunch of Real Technique brushes (love them!) and my sister brushes/makeup I knew she would like (Milani Liquify Eyeliner, Covergirl Lash Blast original mascara (her fav), Ecotools brushes, ELF brushes, and a few other things I can’t remember).

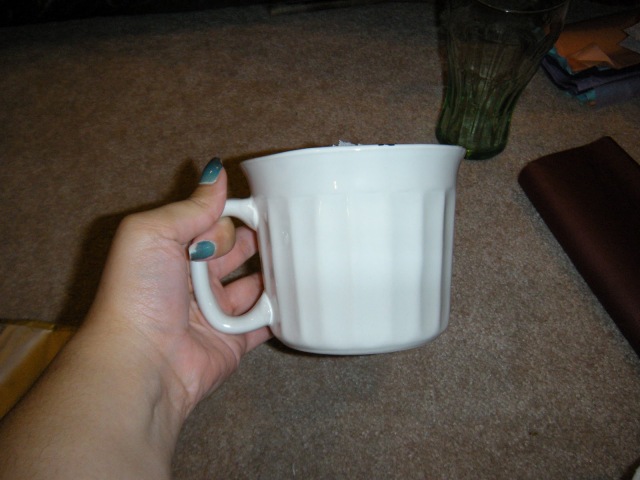
I decided to head to the Dollar Tree to see if they had a glass or mug that I could decoupage. I have decoupaged other items as gifts and had tons of different colored tissue paper left over. I was looking for something that would be tall enough for long brushes but not too tall to fit the smaller travel sized/eye brushes. It also had to have a large enough rim but again, not TOO large like one of those big round cappuccino cups. This was probably the most challenging part of the whole project.
I finally narrowed my choice down to a shorter ceramic mug or a brandy type glass. In the end I chose the mug because I liked that it had a handle and grooves along the side.

cappuccino mug dollar tree dollar store white ceramic with grooves diy makeup brush glass cup
Dollar Tree mug!
Here are all the supplies I used and where I got them.
mod podge crafts decoupage mug diy brush holder cup glass
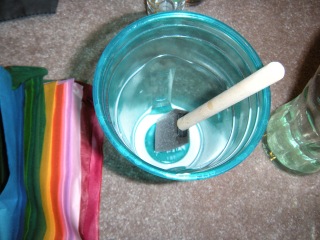
mod podge mixed with water in a cup mod podge crafts decoupage mug diy brush holder cup glass
Mod Podge mixed with some water in a plastic cup
  • mod podge and sponge came in a pack at AC Moore – I used a mixture of the mod podge with water in a plastic cup.
  • A stack of tissue paper which I got from AC Moore for pretty cheap as well a while back.
  • Two ribbons (a yellow and a silver) at AC Moore on sale for 50 cents each!
  • Mug and main tissue paper for the outside I got from the Dollar Tree.
  • I used a sparkly white tissue paper I received in one of my Birchboxes mixed with black on the inside.
  • Glue gun I bought at Walmart for around $10.
I decided the theme I would go for was yellow and gray. I think the combination is very classy/elegant and would match any bathroom/vanity/decor. At first I pictured making the mug gray and with yellow trim, but I found the perfect tissue paper at the dollar store that was the exact style I was going for!

pale yellow pastel shiny white glittery tissue paper ac moore dollar tree decoupage diy makeup brush holder 

damask design tissue paper in gray and white diy makeup brush holder decoupage cup and black tissue paper DOLLAR TREE DOLLAR STORE

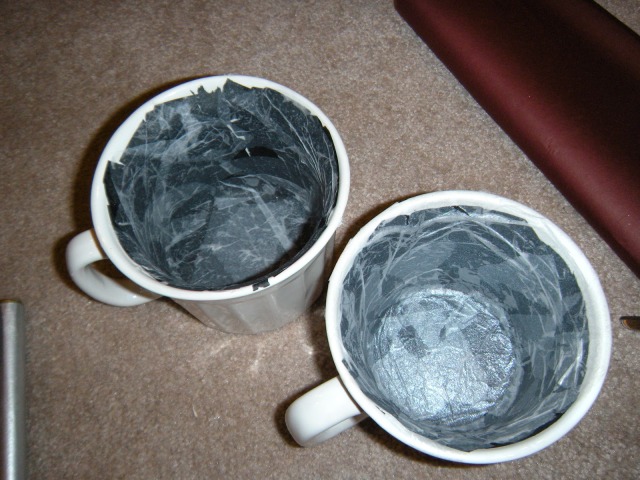
I started with the inside of the mug. I originally wanted it to be gray inside (after finding this cute paper for the outside) but did not have gray tissue paper and could not find it at the store. So, I tried to put black paper first and then the sparkly white.  It didn’t come out gray but I liked the effect anyway.
One layer of black and one layer of white (still wet):

DIY MAKEUP BRUSH HOLDER DECOUPAGE TISSUE PAPER YELLOW AND GREY GRAY DOLLAR STORE DOLLAR TREE

Mugs with black tissue paper and then the shiny/glittery white tissue paper on top
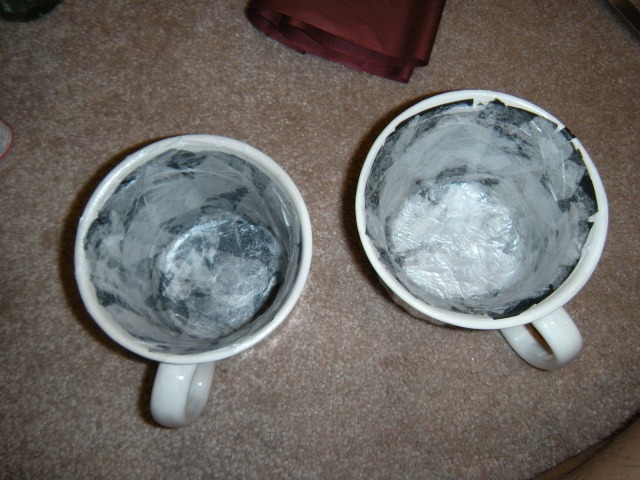
After a few more layers of white, the finished inside:

DIY MAKEUP BRUSH HOLDER DECOUPAGE TISSUE PAPER YELLOW AND GREY GRAY DOLLAR STORE DOLLAR TREE 

DIY MAKEUP BRUSH HOLDER DECOUPAGE TISSUE PAPER YELLOW AND GREY GRAY DOLLAR STORE DOLLAR TREE 

After letting them dry completely (you can use a hairdryer in between layers), I started on the outside. For the outside I chose a pastel yellow (rather than a bright yellow) to go underneath the patterned tissue paper. I was afraid the bright one would show through too much and I’m glad I did the pastel because it was just the subtle effect I was going for, came out perfect.
One layer of pastel yellow:

DIY MAKEUP BRUSH HOLDER DECOUPAGE TISSUE PAPER YELLOW AND GREY GRAY DOLLAR STORE DOLLAR TREE 

DIY MAKEUP BRUSH HOLDER DECOUPAGE TISSUE PAPER YELLOW AND GREY GRAY DOLLAR STORE DOLLAR TREE 

DIY MAKEUP BRUSH HOLDER DECOUPAGE TISSUE PAPER YELLOW AND GREY GRAY DOLLAR STORE DOLLAR TREE 

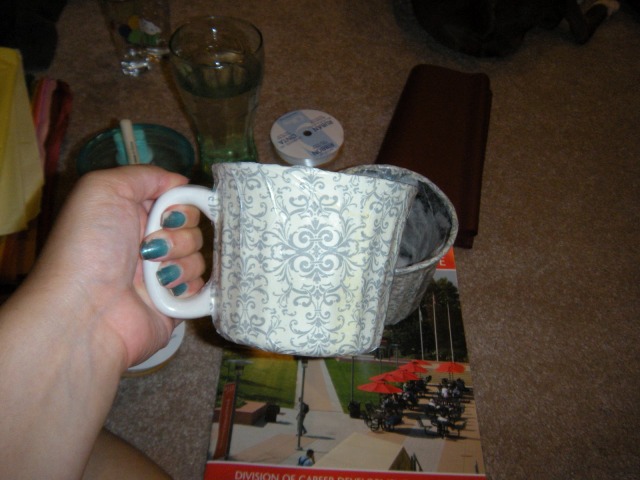
I then added one layer of the patterned tissue. This was really tricky because of the grooves and shape of the mug. The mismatching of the pattern isn’t too noticeable though in the end result.

DIY MAKEUP BRUSH HOLDER DECOUPAGE TISSUE PAPER YELLOW AND GREY GRAY DOLLAR STORE DOLLAR TREE 

DIY MAKEUP BRUSH HOLDER DECOUPAGE TISSUE PAPER YELLOW AND GREY GRAY DOLLAR STORE DOLLAR TREE 

DIY MAKEUP BRUSH HOLDER DECOUPAGE TISSUE PAPER YELLOW AND GREY GRAY DOLLAR STORE DOLLAR TREE 

DIY MAKEUP BRUSH HOLDER DECOUPAGE TISSUE PAPER YELLOW AND GREY GRAY DOLLAR STORE DOLLAR TREE 

I made sure to put the yellow and patterned paper all the way to the bottom to make sure you could not see any part of the mug when it’s placed down. Also, I made the yellow and patterned paper overlap the rim of the mug because I was planning to cover it up anyway.
After I let it dry a bit, I made sure to go over the inside and outside with the mod podge a few times to make sure it was sealed and shiny (if left in the bathroom I didn’t want it getting ruined with humidity or water).
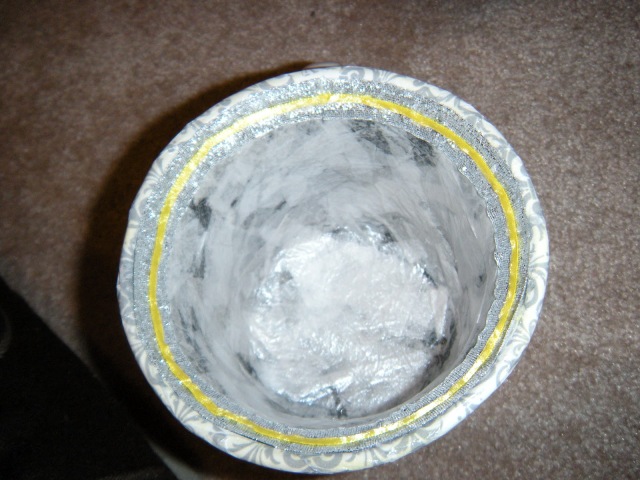
I then began with the ribbon. I first hot glued the silver ribbon along the inner rim of the mug to cover up the seam of the inside and outside tissue paper.

DIY MAKEUP BRUSH HOLDER DECOUPAGE TISSUE PAPER YELLOW AND GREY GRAY DOLLAR STORE DOLLAR TREE 

I was originally going to leave it at that and then add the yellow ribbon in the middle of the silver, but I decided to add another layer of the silver right below the first one.

DIY MAKEUP BRUSH HOLDER DECOUPAGE TISSUE PAPER YELLOW AND GREY GRAY DOLLAR STORE DOLLAR TREE 

I then added the bright yellow ribbon in between the two silver ones.

DIY MAKEUP BRUSH HOLDER DECOUPAGE TISSUE PAPER YELLOW AND GREY GRAY DOLLAR STORE DOLLAR TREE 

I picked the bright yellow rather than a pastel because I thought it needed a pop of color! I let it dry for a day or two and this is the finished mug!

DIY MAKEUP BRUSH HOLDER DECOUPAGE TISSUE PAPER YELLOW AND GREY GRAY DOLLAR STORE DOLLAR TREE 

DIY MAKEUP BRUSH HOLDER DECOUPAGE TISSUE PAPER YELLOW AND GREY GRAY DOLLAR STORE DOLLAR TREE 

I forgot to mention that I left the handles without anything on them. My sister saw me making them before I was done so I asked her advice on it and she told me she would rather it be bare. I figured it was probably for the best because it would be handled a lot (lol see what I did there?) and I don’t know how good it would hold up.

I hope you guys have enjoyed this post! Let me know what else you’d like to see and, if you tried this out I’d love to see pictures. I’m sure you can add rhinestones or glitter, even tulle; anything that suits your style! I have a few more posts to come.
One of the most common irritants a teenager faces in her life is those little red, black and white pustules which spring up on her face overnight!!! The most dreaded eruption which sometimes leaves her depressed and physically and psychologically scarred – The Pimple.
  
WHAT IS A PIMPLE?
Acne Home Remedies
Home Remedies to Get Rid of Acne
A pimple is a red, raised skin blemish that usually contains pus. The most common cause of pimples is acne, a skin disorder which occurs more commonly in teenagers. Acne is generally caused by hormonal changes that occur at puberty. One of the hormones released during this time is testosterone which stimulates the oil gland, Sebaceous gland, found just beneath our skin and close to the hair shaft. Dead skin and dirt on the surface of the skin plugs off the hair shaft and oil keeps getting accumulated under these plugs. A plugged pore causes a blemish which is called a blackhead or a whitehead. Pimples are caused by the Acne Bacillus, a type of germ which thrives in the accumulated oil. This germ makes irritating substances from the oil causing redness and pus.
- See more at: http://readanddigest.com/how-to-get-rid-of-pimples/#sthash.3FqiInLQ.dpuf

Friday, January 1, 2016

5 STYLISH THANKSGIVING IDEAS


Gold-White-Place-SettingThanksgiving is such a special time to spend with family and friends. When hosting Thanksgiving, the major focus for decor is of course, the dining table. There are plenty of different ways to decorate your table, however, we found that metallic golds and a simple white gives your dining table festive elegance you are looking for. Your guests will not only be impressed with your cooking, they’ll also be intrigued by your beautiful dining table
Dipped-Painted-PumpkinPumpkins are always fun to add to your harvest decorations. When decorating, we found this adorable  Double-Dipped Painted Pumpkin! It’s very simple and gives your pumpkins a stylish, chic look. 
Carmel-Spiked-Pumpkin-PieIt’s time for dessert! Did someone say Carmel Pumpkin Pie?! After eating turkey, mashed potatoes, stuffing, green bean casserole, and other thanksgiving classics, pumpkin pie is always the perfect ending to a perfect thanksgiving meal. Carmel is going to be the show stopper ingredient for taking our classic pumpkin pie to the next level! 
Blue-Cheese-Mashed-PotatoesMashed  potatoes is just one of many delicious side dishes that everyone loves! Are you ready to take your mashed potatoes to new heights?! This Buttermilk Blue Cheese Mashed Potatoes will be a hit at your next family thanksgiving or friends-giving. The blue cheese and chives gives it delicious flavor and zest to the creamy buttermilk mashed potatoes. 
Copper-Stripped-PumpkinsFall is finally here and we are loving every minute of it! From the cooler weather to cozy flannels to the beautiful colors of copper, oranges, reds, and yellows. Another staple for fall this season are metallics. Get creative with your pumpkins by adding some metallic ribbon to give it some extra style this season. 
Blackberry-Lemon-Zest-CrostiniAppetizers are also a fun way to get creative for thanksgiving. We found a charming recipe that sweet and delightful just before the turkey comes out of the oven. Blackberry and Lemon Zest Crostini is zesy and sweet, and is a appetizer that is light enough, and not too filling to spoil your thanksgiving dinner. 

DIY DECORATIVE BOXES TUTORIAL


decorative-box
With the holidays coming up, you are sure to be wrapping tons of big and small presents. It just so happens that we have the perfect tutorial for you today! Kelley Davis of Kelley With Love is sharing how to DIY Decorative Boxes that are so easy and adorable they can double as storage. You can personalize and decorate the boxes just by switching out the knobs on top to create any look from simple to glam. Check out Kelley’s amazing tutorial below!
diy-decorative-box
gift-box-tutorial
decorative-box-tutorial
diy-gift-box
diy-party-boxes
party-box
decorative-boxes
decorative-gift-box
gift-box
“We’ve officially entered the season of parties and gifts! I love some gorgeous gift-wrapping, but let’s be honest, we don’t always have time for it. Decorative boxes are a perfect way to showcase a fun gift. Not only will it hold your gift, but it can also be used as a storage box once the gift has been removed. These boxes can be as simple or as decorative as you like. They’ll definitely give the gift recipient “all the feels.” Trust me, you’ll be the envy of all gift givers this season! Instead of giving into grabbing a bunch of gift bags this season, grab some nesting boxes and a few gorgeous knobs and try this gifting alternative below.”
materials1
  • Nesting Boxes or Paper Mache Boxes
  • Tape Measure or Ruler
  • Pencil
  • Drill
  • 1/8 and 5/32 drill bits
  • Decorative Knobs
All of these materials can be found at local craft stores like Hobby Lobby, Anthropologie, or Michaels.
instructions
  1. Use your tape measure or ruler and pencil to mark the center of your box.
  2. Remove your lid and use your drill to drill a hole into the center of the lid at the place you marked.
  3. Push the knob through the hole.
  4. Secure the knob
  5. Fill your box with goodies!
Optional: Wrap your box prior to drilling your hole.
Here are some fun ideas of things to fill your box with:
  • Gourmet candy
  • Pjs
  • Mani/pedi supplies
  • Spices
  • Perfume
  • Bath bombs
  • Stationary

STAYING INSPIRED AND RUNNING A SUCCESSFUL BLOG WITH LEXY WARD OF PROPER


lexy-ward-proper
Are you ready for some major inspiration?! A successful blog, tons of recipes, DIY projects, and a kiddo at home sounds like a lot of hard work! But Lexy Ward of PROPER balances it all gracefully. Keeping up her brand and adding even more to her plate in the near future makes us admire her even more! We love her playful and creative content, she is one seriously creative woman! From starting her blog just for fun to turning it into a successful business, Lexy has some great advice on how to keep up with your work and stay inspired. Read on below to find out what inspires Lexy and how she continues to grow in a competitive business.
lexy ward quote
1. It seems there are a million new blogs that pop up every day.  What advice would you give someone just starting a blogging business?
 Oh gosh! First of all, hang in there! The task-list seems overwhelming, but just remember to start small and tackle one thing at a time! Also, contrary to popular belief, there IS room for everybody! The community is wonderful and supportive so take the time to build relationships that can lift you up when things get tricky!
2. When did you decide to start a blog?  How did the concept behind PROPER come to you?
So I have worked in the creative community for years, but years ago, it was just a side gig! I was actually working a different full-time job and doing styling & event services on the side. My husband (he’s the tech-wiz!) suggested I start “this thing called a blog” to build my portfolio and share things I’m working on and that inspire me!
lexy ward quote 3
3. We love the colorful & playful nature of PROPER! Where do you drive inspiration from?
Thank you! Sheesh, we pull inspiration from everywhere! I like to travel and get a lot of inspiration from plants, colors, and textures I see when traveling. I also like to hit up flea markets and look at old ideas and think about how I can put a new, modern twist on something that was popular in the past.
4. You recently changed the name of your blog from The Proper Pinwheel to PROPER.  Why did you decide to change the name?
You know, I just felt that we had outgrown that name. In blogland, you’re constantly evolving and that can happen with the actual aesthetic of the blog. I really felt like I found my true aesthetic and the content we were sharing just didn’t feel like it was aligning right with the name. So, I just dropped everything to PROPER! And it’s kind of a play on the word, because if you know me in person, you know that I am the FARTHEST thing from “proper!”. I’d like to just say I’m chill.
5. Your blog features so many drool-worthy recipes and whimsical DIY projects!  Have you always been a creative person?
I come from a very large Italian family. That means a lot of cooking and a lot of parties and get-togethers. Growing up, I was always interested in making things myself. And that just kind of translated into this DIY version of myself as an adult! And I LOVE to cook! Crazy fact – I don’t eat everything I make. While I taste it all to be sure it gets my stamp of approval, I usually just give it away! #diabetes
lexy ward quote 4
6. We are swooning over the beautiful images on your blog, so we have to ask!  Who is in charge of producing such beautiful photographs and how can we do it too?!
That’s so sweet of you to say! Photography has definitely been something that we’ve had to work at over the years! If you could go back to some of my very first posts (please don’t!), you would see that the photographs are night and day! As the editor of PROPER, I create most of our editorial calendar and shoot most of the day-to-day content myself. For larger projects, we collaborate with photographers & brands to give the content the oomph it needs. I’m a big believer in experimenting! Test out your camera. Take classes. Just shoot everything in every setting until you figure out what you like and what you don’t!
7. With so many fabulous creations under your belt, we know this is probably a tough question, but what are some of your favorite projects that you’ve worked on?  Any crafty failures you look back on now and laugh?
Oh gosh, I really love our floral food series. We’ve done floral macarons, floral marshmallows, floral pancake wreaths, and my absolute fave would be the floral pie wreath that seems to circulate around the web every Thanksgiving season! Crafty failures? I once made a garland out of loofahs. Shower loofahs. That’s all I will say about that.
8. We can’t praise hard working mammas enough!  With a busy home life and an ever popular blog, how do you find balance in your everyday life?
Caffeine! And a great support system. I honestly thank the heavens for friends and family who totally support what I do. And on those days that I am mentally exhausted and about to crack because I think I can’t go on much longer, they send words of comfort and encouragement and rejuvenate me!
9. How do you plan your blog content?  What’s your process for creating features, photography, writing, etc.?  Any tips on planning ahead?
I like to be as organized as possible, but sometimes ya just gotta fly by the seat of your pants! I typically try to plan things out 4-6 weeks ahead of time. With the holidays, it’s much farther ahead of time. I take a look at the season, the trends, what we are currently working on in our house, and the sponsored content we have already scheduled. And once those are on the calendar, I choose filler posts that are smaller, but still as original as possible, to add in.
10. Your daughter, Vita, is the absolute cutest!  Does she enjoy being just as crafty as her talented mamma?
Oh my gosh. Vita is SUCH a ham! She’s definitely got the creative bug. And that’s a blessing and a curse! She’s always working on whatever I’m working on. If we’re painting something for a shoot, you better believe she’s a few feet away painting her own little something. She is also quite the furniture arranger. She watches me move things around to get the perfect shot and has started doing it herself! She moves all the pillows off the couch and says “take a picture!”.
11. What’s in store for PROPER in the coming future?
I don’t even know where to start! This year has been the craziest and best yet, and we have so many exciting things in the works. I will say that there is going to be a shop, a line of products, and a series of workshops in different cities! So we’ve definitely got a lot to look forward to!

Cracked Nipples Home Remedies

Nipples
From the hungry infant to scratchy undergarments, the nipples can take a beating that leads to the development of painful cracks. Women are not the only ones to suffer the aftermath. For instance, male athletes (such as cross country runners) can experience the same irritation. To minimize the discomfort and encourage healing, perhaps you’d like to get acquainted with home remedies for cracked nipples.

CAUSES AND SYMPTOMS
Nursing mothers are the prime sufferers of cracked nipples because of the wear and tear that comes with an infant hungrily latching on. One of the main reasons a mother will experience cracked or bleeding nipples is an improper latch, which is also accompanied by severe pain. Since feeding an infant is a daily task, healing is sometimes hindered. Using breast pumps is another way that nipples can become damaged [1]. For instance, some women mistakenly turn the suction level up too high or the pump is outfitted with breast shields that are too small.

Another cause of cracked nipples in women includes babies with thrush (yeast infection in the mouth). The infection can be passed on to mothers during breastfeeding and can cause pain and damage. Breastfeeding mothers should look for signs of itchiness, redness, cracks, and shooting pains in the breast during or after a feeding. Bras and undergarments made with abrasive materials that irritate the skin can cause cracked nipples.

Cracked nipples not only affect women, but men can also suffer. Severe dry skin conditions, such as eczema, can cause damage such as scaly, itchy, red patches of skin. Men with a breast cancer called Paget’s disease can experience a rash or irritation of the nipple. There is also a condition called ‘jogger’s nipple’ that strikes runners – especially long-distance runners. Since the nipple tissue is quite sensitive, friction can cause irritation accompanied by soreness and dryness.

CRACKED NIPPLES HOME REMEDIES

One of the most common culprits behind cracked nipples is breastfeeding, but nursing shouldn’t have to become a painful nightmare. As soon as you start to feel discomfort, keep an eye out on the appearance of your nipples. If the damage continues, you may need to consider one of the following home remedies for cracked nipples below:

1) Cold Pack:
Apply a cold pack to your nipples before nursing to enjoy temporary numbness that makes feeding your child less painful. The cold will dull the pain, which comes in especially helpful during the initial latch, which tends to produce the most discomfort.

2) Gentle Cleansing:
When cleaning your nipples, use a gentle approach. Rinse well with water to reduce the risk of infection in cracked nipples. Do not use alcohol, lotions, or perfumes on the nipples or you run the risk of further irritation.

3) Say ‘No’ to Soap:
Following childbirth, a liquid called colostrums emerges from the nipples. This substance acts as a natural lubricant that is removed when you use soaps that can also cause dryness and cracks. This is why you should opt for plain water when cleaning the nipples.

4) Coconut Oil:
Some people have rubbed coconut oil on cracked nipples to encourage effective healing.

5) Wet Washcloth:
A warm, wet washcloth can provide pain relief to cracked nipples before and after nursing.

6) Ice Cubes:
Before allowing a baby to latch up, apply ice cubes to cracked nipples. This will help to decrease the pain that occurs while nursing.

7) Tea Bags:
To enjoy soothing relief from cracked nipples, some women have applied warm, wet tea bags for a brief period of time after nursing.

h) Breast Milk:
Containing vitamin E, breast milk can actually help a mother heal cracked skin. After feeding the little one, pat dry your nipples, and then express a bit of breast milk. Rub in the liquid. Do not follow this home remedy for cracked nipples if you have thrust or you run the risk of spreading a yeast infection. Also, do not use the oil from a vitamin E capsule on your breasts as this is toxic for your baby.

8) Aloe Vera:
Having an aloe vera plant in the home can certainly come in handy. Break or cut open one of the leaves to extract fresh gel that helps speed up the healing process of sore, cracked nipples.

9) Petroleum Jelly:
Coating affected nipples with petroleum jelly (such as Vaseline) can help heal cracked skin. Runners can also apply the petroleum jelly as a lubricant before going out for a run to lessen the effects of chafing.

10) Olive Oil:
Olive oil helps cracked nipples to heal naturally. Using your bare hand, apply the oil to your nipples two to three times per day over the course of a couple days.

11) Lemon Juice and Olive Oil:
If you’re looking to prevent cracks in your nipples during a pregnancy, create a healing blend made out of pure lemon juice and olive oil. Rub the remedy on your nipples throughout your trimesters.

12) Honey and Olive Oil:
A mixture of honey and olive oil can soften and moisturized damaged nipples.

13) Avoid Soap:
When cleaning your irritated nipples, keep in mind that using soap can lead to further cracking.

14) Go Shirtless:
Male joggers prone to cracked nipples should consider taking off their shirt to prevent irritating the skin. Anyone else should choose their clothing carefully. Opting for items made out of silk and Lycra will reduce damage to the nipples. Choose loose-fitting shirts for the best results. Women should wear a sports bra that properly fits and reduced movement of the breast.

15) Surgical Tape and Cotton:
Protect a healing nipple by using a piece of surgical tape to cover a small amount of cotton over the damage.

16) Band-Aid:
When running or participating in sports with cracked nipples, use a Band-Aid as protection during any activity.

17) Diaper Rash Cream:
Soothing ointments, such as diaper rash cream, have been known to ease the pain of irritated skin.

Thursday, December 31, 2015

5 All-Natural Makeup Removers

Making your own natural makeup remover is one of the easiest beauty hacks in the book, and you can successfully scour your kitchen cabinets or grocery aisle without breaking the bank. Best of all, it makes sensitive skin extra happy, and happy skin makes a happy lady, right? Here are a few common oils and foods that double up as ah-mah-zing makeup removers. Give them a try!

Avocado: All you need is a fresh avocado and a q-tip to make some makeup removing magic happen. Gently swab the avocado to pick up the nourishing oils (no need to take out any chunks), and watch those raccoon eyes disappear. Plus, the omega-3 fatty acids and vitamins A, D and E found in avocado oil double as a moisture-rice eye cream.

Grape Seed Oil: This lighter remover is one of my go-tos. Use a little cotton pad to soak up some grape seed goodness and you’ll be fresh-faced in no time. Multitasking tip: use grapeseed oil on your entire face to prevent acne, clear up sun spots and kick wrinkles to the curb.

Cucumber Slices: There’s a reason everyone’s mental image of an at-home facial involves cucumber slices. Although they’ve become synonymous with depuffing eyes, they’re also a great way to wipe off makeup the all natural way (and you look pretty awesome laying on your couch with cucumber eyes too.)

Jojoba Oil: Awkward name aside, Jojoba (ho-ho-bah) means business. For makeup remover, mix 2 parts water to 1 part Jojoba oil and voilá! Say adios to those stubborn mascaras and eyeliners. I also use Jojoba oil as a moisturizer, cuticle cream, or even as a warm hair masque.

Coconut Oil: Is there anything coconut oil can’t do? Hair smoother, skin soother, teeth and gum cleaner . . . Check out Meghan’s post from Lash Week on DIY coconut oil makeup remover and see how she uses her own mix in her daily skincare routine.

Have any other all natural makeup remover hacks you swear by? We’re always down to try something new!

How to create Makeup Cleansing Towelettes - DIY

with all of my costume makeup-ing i have been in dire need of makeup remover wipes. washing your face in the sink helps clean, but it does not remove ALL makeup residue. i find that often i have residue around my eyes, hairline, or near my earlobes that i have missed. since our budget is a little tighter of late, i decided to research making my own makeup remover wipes.
i have put together the following tutorial so that you too can make your own makeup remover wipes.

ingredients:

1  2-ply paper towel roll
1  very sharp knife
4  cups water
a dash of baby wash (i prefer Aveeno, non-comedogenic, hypo-allergenic, and doesn't sting your eyes)
a container for your wipes (high class all the way, an old Daisy Sour Cream container)


step 1:

measure your container to your paper towel roll to determine length of cut. with knife, cut through paper towel roll.


step 2:

mix a dash of your preferred baby wash (why baby wash? because it is a gentle cleanser and typically doesn't irritate skin) with 4 cups of water.


step 3:

place paper towel roll in container to make sure it fits! (roll will be very difficult to re-cut once it is wet)


step 4:

remove paper towel roll, add 1 cup of water to bottom of container. replace paper towel roll and add remaining cleansing solution. once solution is absorbed, remove cardboard center.


that's it! so simple and the whole process took me less than five minutes, including finding all materials which i had around the house. place your wipes in a location that doesn't scream, SOUR CREAM and enjoy!


xo,
Angel