Showing posts with label recipes. Show all posts

Thursday, March 24, 2016

How to Make 8 Foods Instantly Better With Tea

You probably don’t need us to tell you all the benefits of sipping tea. But what you might not realize is that adding the drink to some of your favorite recipes and foods can make them taste so, so much better.

If the only thing you’re doing with your tea is drinking it, we’re here to tell you that you’re seriously missing out. Turns out the drink is versatile. Like, really versatile. (We’re talking brine-your-chicken-in-it, mix-your-butter-with-it, turn-it-into-dessert versatile.) Check out these eight very unexpected—and very delicious—ways to up your food game by simply adding some Iced Tea.

Oatmeal + Tea = Breakfast with a Twist

Whether you’re whipping it up from scratch or going the instant oats route, replace half of the water with unsweetened black or green tea. The oats will cook up just the same, but you get the added bonus of some extra flavor.

Chicken + Tea = The Juiciest Bird

Allow the chicken or turkey to sit in a bath of sweet tea in the refrigerator for several hours to infuse moisture and flavor into the meat. Just be warned: Anyone who tastes the final product—which will have a subtly sweet and unique flavor—to immediately ask you for the recipe. We give you permission to say it was a very complicated process and involved too many ingredients to count.

Tea + Freezer = Your New Favorite Dessert

Grab your favorite flavor, pour it into a pops maker, freeze and enjoy a guilt-free, fat-free dessert.
 

Butter + Tea = Better Butter

Add a tbsp. of lemon tea to a stick of melted butter. Put the mixture in the fridge to harden. Serve on grilled fish or with warm bread while discussing how you’ll never go back to regular old butter again.


Meat + Tea = A Tender Steak

Use tea’s tenderizing tannins to your advantage: Add black tea to your marinade before throwing the meat in a pan or on the grill. The result: steaks that are juicy, never tough.
 

Tea + Freezer (Part 2) = Not-So-Basic Ice Cubes

Step 1: Pour your favorite tea into ice cube trays and let freeze.
Step 2: Throw them in a glass and add tea (bonus points for mixing flavors).
Step 3: Smugly congratulate self on never having to drink water-down-thanks-to-melty-ice-cubes drinks again.
  

Rice + Tea = A Stellar Side

Use green tea in place of water when cooking rice and grains. Just like with the oatmeal, the rice kernels soak up the delicate flavor perfectly.
 

Chocolate + Tea = Next Level Fondue

Melt pieces of bittersweet dark chocolate with a dash of black or green tea and then dip pieces of fruit into your homemade fondue.

Sunday, March 20, 2016

Easy Oatmeal Breakfast: Recipe

I’m not the biggest fan of oatmeal. Not in its purest form that is. Give me oatmeal with some milk (warm or cold), big chance that I’ll stop eating after two bites or so. I simply don’t like the texture of it. But I do know the benefits of eating oatmeal and a while ago I was looking for an alternative instead of the bread I usually eat. My solution? Easy: make some oatmeal and pimp it with loads of fruit, raisins, nuts or whatever you find tasteful. Oh, and instead of regular milk, I use soya milk. It adds just that extra bit of taste!

Oatmeal breakfast fruit
How I do it:

Ingredients
60 g oatmeal
cold soya milk (make sure all the oatmeal is covered with milk)
a handful of strawberries
half a banana
an apple
raisins

Pour the soya milk over the oatmeal and put it in the fridge. The oatmeal will absorb the milk and meanwhile the ‘porridge’ stays cold. Cut the fruit into tiny pieces. Put everything together and enjoy your healthy breakfast!

Oatmeal breakfast with a lot of fruit

now sushi-me, now you don’t

After a long, cold day walking around the city, nothing sounds better than a huge plate of carbs. Okay, fine… some protein too would probably be good for me too. My favorite way to combine the two food groups is through sushi. Right off of the Metuchen Train Station is a small little place, Sushi Suzuki, that called my name.

The space is definitely small but there’s nothing small about their plates of food and flavor. I had to quickly take a picture before the plate was devoured. Now you see me…

sushi plate
Starting in the top, right corner and working clockwise…

Shrimp Tempura, Philadelphia, Peanut Avocado, Pink Lady, Cucumber Avocado, and Black Pepper Tuna. 

Shrimp tempura roll is filled with two big pieces of perfectly panko bread crusted shrimp. Cucumber surrounds the shrimp for a good, refreshing bite. I love how small the cucumber is chopped. It just tastes better than a chunk of cucumber. This roll is a classic but definitely not one to pass up.
Another classic is the Philadelphia roll. Suzuki does it right though. The ratio of smoked salmon to cream cheese is perfect. Neither is too overpowering. The fish and cucumber provide a slight bite while the cream cheese pulls all the flavors together.

The peanut avocado is filled with chunks of raw peanuts tossed with a little bit of honey and surrounded by fresh, creamy avocado. This roll is all about the balance of texture and flavor. It is crunchy, savory, smooth, and sweet.

suzuki

The pink lady roll is a specialty roll here at Sushi Suzuki. Inside the rice and pink soy bean paper wrap is salmon tempura (Which means salmon is fried with panko bread crumbs). Accompanying the salmon is yellowtail tuna, avocado and tobiko. The roll is drizzled with spicy mayo and eel sauce. Sweet and spicy-yum.

A cucumber avocado roll is sort of a staple that I must have when I’m eating sushi. I call it the palette cleanser. When you want to separate all of the flavors from all the other rolls, you just take a bite of the cooling, water-filled cucumber avocado roll and your next bite is like your first bite all over again. I know that this is what the ginger is supposed to be for but I put ginger on them all because I like it so much so it doesn’t do anything for me in that respect.

Finally, the black pepper tuna roll. This is different take on your ordinary tuna roll. The fish is rolled with spicy black pepper which isn’t overpowering but definitely gives you a nice added flavor. How do you describe black pepper? Well, however you do, it’s like that.

pinklady
Anyway, every time I come to this sushi place I’m never disappointed. Everything is ALWAYS fresh and I never leave feeling like I need to go buy the next size up pair of jeans- which is a plus…not plus size.
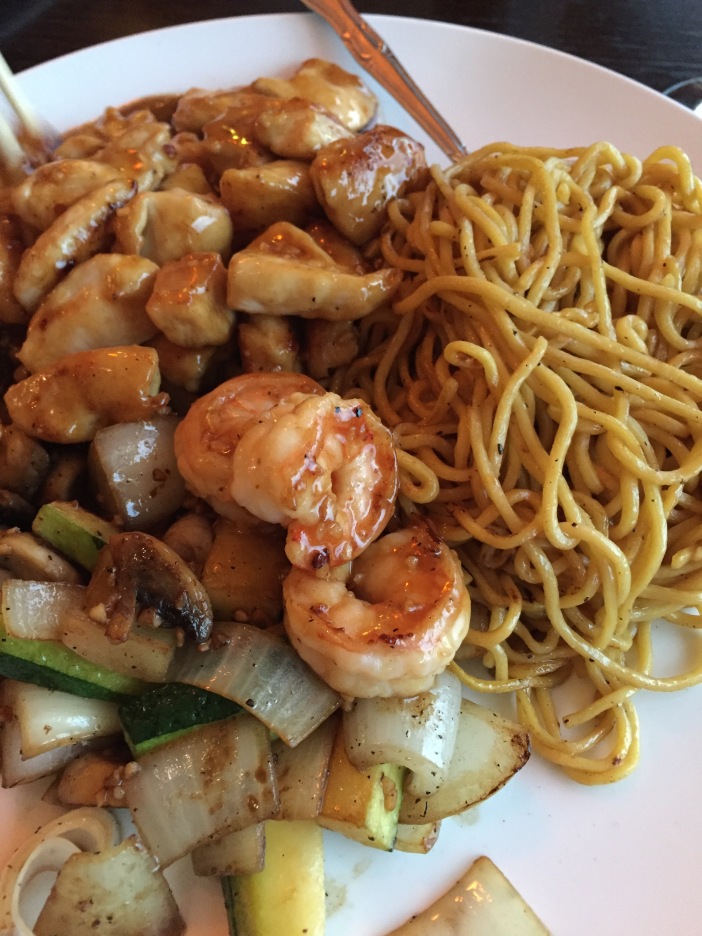
Now, I know this isn’t sushi but they also have some killer hibachi plates if you aren’t into all that raw stuff.
hibachisuzuki
The plate is FILLED with food. So many good vegetables, shrimp, chicken, and noodles. Their hibachi dinners are also served with miso soup AND a salad. All for a really good price. So really, this place isn’t just for sushi lovers-all taste buds are welcomed here.
After about 20 minutes of digging into these plates–> they’re empty and I feel like I’ve done something right for myself.

Avocado chocolate sweetness

For me, chocolate is the best thing to end a meal with.
This recipe is for all your guests who avoid chocolate because they’re on a diet, for all the ones who love healthy cooking and for the real chocolate lovers amongst us, who would try anything with chocolate.
Chocolate avocado sweetness-3
Ingredients
1 banana
1 avocado
30 – 40 g cacao powder

Optional: strawberries
This recipe doesn’t need a lot of words. Chop the fruit in tiny pieces and mix the ingredients. Taste and add some more banana or cacao powder if you feel it needs it. Serve with some fruit or however you like it. Enjoy!

BLACK CONCORD MARTINI: Recipe

I’ve decided that Mother Nature and I should be friends. After all, she created the Concord grape with its jam-like flavor, beautiful deep purple skin, and sweet aroma. She’s a genius and I want to hang out with her, share a cocktail or two and discuss the Concord grape. So it’s only fitting that I take this beautiful berry (yes, grapes are technically berries, who knew) and turn them into a luscious weekend cocktail to enjoy!
Black Concord Martinis are my ode to this beautiful fruit, a jubilee of grape goodness with a little help from black currant, vodka and lime, all the best party companions. This martini starts by cooking down fresh concord grapes with water and sugar to make the base. A thinner version of quick homemade grape jelly, that when cooled and strained, gives this drink it’s vibrant fuchsia color and sweet grape flavor.
Just a splash of black currant liqueur and a hit of fresh lime make the grape flavors sing. It’s just that simple. No complicated ingredients, processes, or supplies needed. Pure sweet grape goodness just as Mother Nature intended had she liked a having a cocktail or two.
To compliment this cocktail, serve alongside a simple cheese platter. You’ll be hard pressed to find a more fitting companion for cheese than grapes and this Black Concord Martini does just the trick! Enjoy your weekend and happy sipping my friends.

Black Concord Martini
Ingredients
  1. CONCORD GRAPE SYRUP
  2. 3 cups concord grapes
  3. 1/2 cup sugar
  4. 1 cup water
  5. MARTINI
  6. 5 oz vodka
  7. 4 oz concord grape syrup (recipe above)
  8. 1 oz cassis liqueur (black currant)
  9. juice of one lime
  10. small clusters of concord grapes for garnish
Instructions
  1. MAKE THE GRAPE SYRUP: In a sauce pan, combine grapes, sugar and water. Cook over medium-high heat for 10-15 minutes stirring frequently until grapes have burst and syrup has become thick and bubbly.
  2. Remove from heat and press syrup through a fine mess sieve. Discard pulp and refrigerate syrup until cool or ready to use.
  3. MAKE THE MARTINI: In a cocktail shaker filled with ice, combine vodka, 4 oz concord syrup, cassis liqueur, and lime juice.
  4. Shake until well chilled and pour into two glasses.
  5. Garnish with a small cluster of concord grapes.
Notes
  1. Note: This cocktail tends to be on the sweeter side where cocktails are concerned. You can always adjust the sweetness by lessening the amount of sugar in your Concord Grape Syrup if you prefer.

Incredibly Delicious Pasta Recipes & Wine Pairings

OK, I admit it – I have a bit of a thing for fresh pasta. I mean seriously, what’s not to love? I can’t think of another dish that delivers more nutrition and flavor and pure hedonistic eating pleasure that a bowl of amazing fresh noodles topped with a bright delicious sauce. When it comes to dressing pasta, the only limit to the flavors and ingredients we can get into a bowl is our imagination. With this in mind, I have put together a collection of some of my absolute all-time favorite pasta recipes at the bottom of this article, but today want to delve into the hands-down easiest way to take a bowl of noodles to the next level – and that’s by making your own pasta from scratch.

Why Fresher Is Better

The spectacular and delicious range of pasta dishes served in homes and restaurants around the world is somehow betrayed by the simplicity – both in process and the short list of ingredients – involved in making fresh pasta from scratch. Great fresh homemade pasta isn’t accomplished with a lengthy list of ingredients, but rather by using the right top quality ingredients. In its purest form, pasta contains three ingredients – flour, egg and a pinch of salt. Let’s start with the easy one first – use the freshest high grade eggs you can get your hands on. The fresher the eggs, the better the flavor and color of the resulting noodles, but you will also find fresher whites provide for better binding and integration with the flour.
And speaking of flour – don’t try and get away with any old bag you’ve got sitting around in the cupboard, but rather spring for the special stuff called “Semolina” which delivers flavor and texture that will take your noodles to the next level. This coarsely ground grain is richer in protein and somewhat lower in gluten than other types of flour, and when combined with super fresh eggs (also offer better protein content than less fresh options) helps to integrate these two humble ingredients in a way that delivers the perfect texture.
With these bases covered, the process is every bit as simple, if somewhat laborious. One need only ask Google for some feedback on the right ratios of egg to flour to realize that there are dozens of variations and theories on the best fresh pasta recipe. In my experience, the best results are achieved by combining 2 1/2 cups of flour with 2 eggs and four additional egg yolks – along with a pinch or two of salt.
Last but not least, you simply cannot “over-knead” pasta dough. The better incorporated and integrated the egg and flour become, the better your results will be. While there are a handy kneading attachments available for kitchen mixers, I’d recommend rolling up your sleeves and doing it the old-fashioned way. I’ve found it’s often easier to break your dough down into smaller batches for kneading once the ingredients have become more or less evenly combined. If you use my suggested recipe, above, I’ve found that this can be cut into three or four manageable balls of dough, each of which can been further kneaded by hand with ease.
Once you’ve allowed the dough to rest, all that’s left is to roll your pasta into sheets and cut it. I’ve found that rolling pasta into sheets is best done using a pasta making machine – however cutting by hand can add a really nice rustic touch to some pasta dishes. If you’ve put the hard work into kneading it well, this should be a breeze. In fact, the toughest part of this process is deciding which shape noodle you want to enjoy – and being patient enough to let it finish cooking!

All Shapes & Sizes

Have you ever noticed that different shapes of pasta seem to actually taste different? I sure have. And I’ve also found that the sauces, toppings and accompaniments adorning a given pasta dish can taste and behave quite differently based on the shape of the noodle they’re riding with. While this is largely a matter of personal opinion and preference, I tend to serve short noodles with sauces that contain piece of meat, fish, seafood or vegetables. Broad noodles, like pappardelle or fettuccini are great with rich or creamy sauces, while long narrower noodles like angel hair or spaghetti match well with lighter fresh tomato or oil based sauces.

Top It All Off In Style

If you’ve made it this far, I’ve got great news for you – it’s really hard to top awesome homemade fresh pasta with anything that isn’t going to taste great! That said, if you’ve made the effort to craft something delicious, why not go the extra mile and top it off in style! While a big ol’ heaping spoonful of grated cheese has become a common way to finish just about any pasta dish (and don’t get me wrong – I probably enjoy more than a standard ration of parmesan cheese each year…) there are two often overlooked additions that bring offer a delicious and bright alternative.
Why not replace (or enhance) your grated cheese with a handful of roughly chopped fresh herbs like basil or oregano followed by a generous drizzle of top quality finishing oil. If you go down this path, you’ll need to add a light sprinkle of coarse salt to replace this virtue often achieved by the addition of parmesan or romano cheese. Another great option is to sprinkle a few chunks of diced fresh tomato (uncooked) over your dish, adding an awesome light and refreshing element to an otherwise rich and savoury plate.

5 Incredibly Easy Ways to Make Wine You’re Already Buying Taste Better

If you find you’re not enjoying the wines you buy quite as much as you might like, I’ve got news for you: you’re not alone! Today I want to talk a bit about a few common mistakes people make when serving wine, and easy fixes to these problems that will have you enjoying a more delicious and fulfilling experience that exceeds your expectations.
We’ve all been there – that moment, when after great anticipation, enthusiasm and excitement – whether it be following a recommendation from a trusted local store employee, a glowing review from an important wine critic, tasting while traveling through wine country, a must-try endorsement from a wine-loving friend, or worst yet, through your own research and shopping experience – you finally sit down to try a wine you’ve been dying to taste. You pull the cork, pour yourself a glass and take a sip.
And, well… it’s ok.
Or worse yet, it’s less than ok.
But it’s not exciting or delicious or creating a sensational desire to take another sip – or the any of the other wonderful things you expected or wanted or had been hoping for. This result can be one of the most disappointing wine experiences you can have; approaching a wine with enthusiasm and excitement and a desire to fall in love at first sip, and it just doesn’t live up to your lofty expectations. More often than not, we chalk experiences like this up to faulty advice from the referring party.
But is this really the answer?
Or are there other reasons why wines just don’t taste as good as we’d like them to?
The short answer is yes. Wine is a living and breathing product that is made from natural organic materials. Not only can the way we handle and serve wine impact our enjoyment, but the wine itself can change and taste differently based on a myriad of considerations. The jumping off point in this conversation is to shift perspective; let’s think about wine less as just another beverage – and personify it to a certain extent, and in turn look at how we handle and serve wine with a focus on its “living, breathing” qualities.
My experience is that there are a handful of reasons why sometimes wines underwhelm, so allow me to walk you through the 5 most common reasons why you might not be enjoying wines you buy, quite as much as you’d like to. More importantly, I’ve got some simple and easy fixes you can employ to make sure the wines you’re drinking deliver the amazing, astonishing, delicious brag-worthy WOW-factor you’re after. So here we go with our list of 5 incredibly easy ways to make wine you’re already buying taste better.

1. Your Wine Has A Fever

The #1 way to ruin a great glass of red wine? Serving it too warm. We all learn early in our wine education that white wine should be served chilled and red wine should be served un-chilled. And at a very basic level this is true. However, the idea that reds and whites are intended to be served at vastly different temperatures is one of the most destructive forces in the enjoyment of many wines.
Reds served too warm tend to lose their balance; alcohol comes across as more prevalent, volatile acidity is accentuated and perhaps most importantly, lukewarm beverages are just not that refreshing, which gets us away from the basic purpose of consuming a glass of wine.
Not all red wines are intended to be served at the same temperature, but as a loose guideline, reds should be served between 59 and 65 degrees F. Lighter reds should be served at the cooler end of that range, and richer more robust reds towards the higher end. And in case you don’t intended to insert a thermometer into your wine glass before taking a sip, in practical terms this range means somewhere between lightly chilled, at the low end, to cool, at the higher end.

2. Your Wine Is Shivering

If serving wine too warm is the most common felony amongst red wine crimes, then serving whites too cold may get you early parole, but you probably still won’t like your new bunkmate. A glass of white wine served too cold will eventually warm up to a more suitable temperature, but the initial experience – that first sip – which informs so much of our lasting impressions of a given wine, stands to you leave underwhelmed.
Much like the discussion around reds, above, service temperature of whites generally falls within a range between 50 and 56 degrees F – or, in practical terms, cold (but not frosty) through to cool, at the warmer end of the spectrum. Light unoaked wines tend to show better near the lower end of that temperature range, whereas richer, more opulent and oaky whites strut their best stuff at the higher end.

3. Your Wine Hasn’t Grown Up Yet

Somewhere well north of 90% of the wine purchased by the average person get it’s opportunity to age in the trunk of their car on the way home from the local wine shop – and that’s about it. We often purchase wine like groceries; pick up a bottle today to serve at dinner tonight, or perhaps later that same week. If you find this describes the way you buy wine, I’d encourage you to try a different approach.
If you’re reading this article, it’s probably because you like wine. You may not open a bottle every night of the week, but you are keen to experience different flavours, you appreciate better quality, you spend a bit more on occasion to get something you adore and most importantly, you’re engaged and interested. With all this in mind, better wines, really benefit from a bit of time resting before you drink them.
While it’s easy to assume this idea applies to famous, expensive rare bottles from Bordeaux, few of us realize that it actually holds true with many well-made wines at much lower prices. Amongst the wines listed immediately below, you’ll even find a $20 bottle that I think serves a prime example; in fact, I wouldn’t need to try too hard to find you wines selling for $15 (or less) that taste better after some time in the cellar.
Not everyone has the time or space or inclination to build a fancy wine cellar and age wines, but do yourself this small favour – start picking up wines, a few bottles at a time, and allow them to rest for a few months before pulling the cork. Build a small library (even 20-30 bottles of various styles and flavours) and you will be stunned at the frequency with which these wines begin to meet and exceed – rather than failing to live up to – your expectations.

4. Your Wine Is Suffocating

Early on in this article, I described wine as something of a “living and breathing” creature. Well, there aren’t too many living creatures who put their best foot forward if they can’t breathe. But that’s exactly how many of us serve wine; we pull the cork and pour. Further to Point #3, above, aging is effectively the slow interaction of air with wine. Unopened, the cork allows small amounts of air to pass through and interact with the wine, softening tannins and acidity, and generally producing a gentler, mellower glass of wine.
Much like aging, there are few wines that won’t benefit from allowing them to “breathe” a bit before serving; effectively, you’re accomplishing a bunch of the same stuff that aging allows for by removing the cork and allowing the wine to interact with air at a much more rapid rate. Other tools to introduce air to wine include decanting or even swirling the wine around your glass.
The result? You’ll find the wine more generous aromatically, exploding from the glass rather than cowering in the corner. You will likely also find that allowing wines to breathe will create a somewhat softer, more voluptuous and round mouthfeel, rather than being dominated by harsh and assertive tannins.

5. Your Wine Is Looking For Its Friends

While this is the final point on our list today, in many respects it could have been #1. It has been said that in life, “context is king” – and there’s nowhere in the world of food and drink where that idiom holds more truth than with wine. Whether deciding on food and wine pairings, the surroundings where we’ll be serving a given wine (outdoors on the patio vs a fancy restaurant, for example) or even the people we’ll be serving it to, consider presenting wine in the presence of its friends.
I frequently hear stories from clients and wine lovers who have traveled abroad and discovered a new wine. The story begins with tasting a new wine in the cellar or tasting room of a beautiful estate along with a passionate vigneron, walking them through the experience – and perhaps even some amazing local munchies while sampling this vinous treasure.
Before leaving, you pick up a few more bottles, take them back to the hotel and find them to be every bit as magical and profound and delicious, drinking them over the ensuing days. This was one of those charmed wine experiences; coming across a wine that satisfied each and every last one of your taste buds; you couldn’t stop talking about it as you continued through your trip – and couldn’t wait to get home and order some to show your friends.
It was truly love at first sip.
Flash forward: return home and jump through the hoops involved in getting your new discovery specially imported. After weeks, or months of anticipation you get a call from your local wine shop – your case has arrived! You race to the store at your earliest moment, pick up the case and bring it home. To celebrate the arrival of your new adoption, you plan a special meal and invite your closest wine-loving friends to come taste the most extraordinary wine you’ve ever had.
Everything is perfect. Your guests arrive, and as you sit down for dinner you share a splash of your special wine with your best friends to enjoy alongside your incredible meal. And then it happens.
The wine is just ok.
Somehow, it just doesn’t taste the same. You can’t quite put your finger on what’s changed, but it’s lacking the magic you remember exploding forth from each bottle and glass.
Now it’s entirely possible that something did change in the wine itself between these two experiences, but it’s worth noting that some other things were different too. You were no longer on vacation. You were not standing with the winemaker. You weren’t surrounded by the history and culture and passion and beauty of the wine estate. You weren’t munching on local foods in sublime unpretentious surroundings without the slightest expectation of tripping over the best wine you’ve ever tasted.
I tell this story not to minimalize the experience – in fact, as a professional wine hunter, I’ve had many just like it. Rather, I am holding this up as an example; an example many of us can identify with, to showcase how much better wine tastes when you let it hang out with its friends.
Some wines are made to go with casual and light tapas-style fare while dining al fresco, and just don’t taste as good with a big ‘ol piece of steak. Some wines taste amazing with sushi, but don’t work with roast shoulder of pork. Still other wines are great to sit and sip all on their own, but seem to fall apart next to all matter of food.
So, what’s my rule of thumb in finding out which friends the wine I’m drinking wants to hang with?
Well, for starters, I recommend emphasizing local food and wine pairings: Tuscan reds with gorgeous pasta adorned with incredibly aromatic fresh basil infused tomato sauce; southern Rhone reds with stunning rosemary rubbed lamb; dry Sherry with traditional southern Spanish tapas like olives and almonds and fish. And when all else fails, trust my instincts and experiment a bit. When something works brilliantly, do it again, or try a slight variation on the same theme, but always at the back of my mind is that I am compiling a guest-list; a guest-list focused on the friends my wine would like to spend the evening with.

Recipe: 20-Minute Spicy Tomato-Mushroom Tortellini

I don't eat tortellini often; I'm not sure why. Maybe it's because it doesn't feel like there's ever enough, or maybe it's because I have only had it with sauces that are too heavy for the little cheese packages. That must be it, because after making this recipe, I can't come up with any other explanation. The tomato sauce is light enough to offset any heaviness the cheese in the tortellini may bring, and the mushrooms contribute an earthiness that is always amazing with tomatoes.
I specify using a can of Italian tomatoes (any brand touting San Marzano is my preference). San Marzano tomatoes have a richer, more concentrated tomato flavor. These are a little more expensive than the domestic brands, but for this you want to invest in Italian tomatoes, since the tomato sauce is the focus of the dish. Same thing for the tomato paste — if you can find Italian tomato paste, great. If not, it's not too big of a deal. What really matters is the quality of the tomatoes.
The 19-ounce package of tortellini I used makes exactly five portions (one cup each). If you don't think that will sustain you, particularly because the sauce is relatively light, feel free to get an extra package and throw it in there. The sauce makes more than what is necessary for one 19-ounce package, so you’ll be fine with adding some extra tortellini to the pasta water. When reheating, definitely add that tablespoon of water and make sure the lid is mostly secure (and just a sliver of an opening to allow steam to escape). This dish is prone to drying out, and we don’t want that.

Spicy Tomato-Mushroom Tortellini

Makes 5 (1-cup) portions
19-ounce package cheese tortellini, frozen
1 small onion, minced
3 cloves garlic, minced
4 ounces cremini mushrooms, sliced thinly
1/2 to 1 tablespoon red pepper flakes
5 1/2 ounces tomato paste
1 (28-ounce) can Italian tomatoes
Parmesan
Heat 2 tablespoons olive oil over medium-high heat in a deep skillet. Sauté onions and garlic until onions are translucent. Add sliced mushrooms and sauté until soft. Add red pepper flakes according to your preference. Your tongue should tingle, not scream.
Add tomato paste to pan, and stir until mixed well. Stir in canned tomatoes. If the tomatoes are whole peeled tomatoes, gently mash the tomatoes (they will splatter if you aren't careful). Reduce heat to simmer for 15 minutes.
While sauce is simmering, cook tortellini according to package directions. Once drained, toss with 1 to 2 tablespoons olive oil.
Fold about half of the sauce into tortellini. Refrigerate or freeze remaining sauce (it'll only get better — and you get even more meals out of it. Win!).
To portion: 1 cup of pasta into 5 separate containers. This recipe makes almost exactly 5 portions. Before freezing, sprinkle grated Parmesan as desired.
To reheat: Microwave on high with lid slightly ajar for 3 minutes.

Recipe: Chicken & Broccoli Alfredo

Do you ever feel a little naughty eating pasta Alfredo? Like you’re doing something you shouldn’t, eating carbohydrates slathered in rich, creamy sauce? I do, sometimes. I also feel like having something green would completely cancel out any harm the cream may do to my arteries. And adding in a protein just makes it a perfectly balanced meal, right? Obviously, chicken and broccoli Alfredo is the perfect meal. It covers all the basic food groups including garlic and cheese (because those are in their own category — I’m sure of it).
This particular recipe satisfies in a way plain ol’ Alfredo just doesn’t. Aside from the broccoli making me feel like I’m eating healthily, there’s just something about garlicky cream sauce that goes perfectly with broccoli and chicken. Here, I use penne pasta to steer from the classic fettuccine for two reasons: one, the ridges in the penne carry more of the sauce than a long, flat pasta can, and two, penne pasta freezes and reheats like a dream — no clumping to worry about.
This recipe yields about four (one-cup) portions. If you aren't making this to eat right away freeze portions in microwave-safe, freezer-safe containers for up to one month. There's no need to thaw it out before microwaving. If you bring a container of this pasta along for lunch, stick it in the fridge to slowly defrost.
Next time you're sitting at your desk faced with the prospect of some frozen meal hidden in the depths of the work freezer, or a trip to the less-than-stellar cafeteria, remember that you were smart and made yourself your own frozen meal.

Chicken & Broccoli Alfredo

Serves 4
1 pound penne pasta
1 to 2 boneless, skinless chicken breast, prepared as desired
3/4 cup heavy cream
2 cloves garlic, minced/crushed
1/3 cup Parmigiano Reggiano, grated (plus extra for serving)
1/4 cup unsalted butter
8 ounces frozen broccoli (see Recipe Note)
Prepare chicken breasts as desired. I recommend butterflying and seasoning with salt, pepper, and garlic powder and pan-frying in olive oil over medium heat about 8 to 10 minutes or until it's no longer pink and juices run clear when sliced. Transfer cooked chicken to a cutting board and let rest before slicing into strips.
Cook pasta until barely al dente. Before draining, save 1/2 cup of pasta water.
Meanwhile, add cream, garlic, and butter to small saucepan. Season with salt and pepper. Heat on low, stirring occasionally, until garlic is soft and fragrant and butter had melted. Do not boil.
Return pasta to pot and turn heat on to medium-high. Add reserved pasta water and sprinkle with half the Parmigiano Reggiano, mixing well. Add sauce and rest of cheese. Continue mixing until well-coated and sauce reduces, about 3 to 5 minutes. Toss in chicken.
To freeze: Place 1 cup of pasta, plus 4 to 6 slices of chicken and 4 to 6 florets of frozen broccoli (or as desired) in flat, freezer- and microwave-safe containers. Freeze up to 1 month.
To reheat: Add about 1 tablespoon of cream, milk, or water. Microwave with lid ajar on high heat for 2 minutes and 30 seconds. Stir, then microwave for 1 minute more.

Recipe Notes

  • The frozen broccoli makes this really simple, although it won't take too much more time to cut and steam some fresh or pre-cut florets. And you can toss the broccoli with the rest of the good stuff. Adding the already frozen broccoli is quick, although you will have to take the size of your container into account (since it won't be as yielding as the steamed, hot broccoli).

Friday, January 1, 2016

HEARTY PUMPKIN SOUP RECIPE + DIY PUMPKIN BOWLS


HEARTY PUMPKIN SOUP RECIPE + DIY PUMPKIN BOWLS

pumpkin-soup
If this isn’t the perfect fall dinner, we don’t know what is! Back on BFFF today to give us some serious dinner party inspiration and share her hearty pumpkin soup recipe. Even though we are fans of anything pumpkin, this soup is absolutely amazing! It’s perfect to serve for a small party or even a dinner of two. Plus, how cute are the individual pumpkin bowls?! Check out Abby’s recipe and picture perfect dinner below!
fall-soup
fall-dinner-friends
fall-dinner-setup
fall-dinner-decor

fall-dessert
fall-setup
fall-dinner-party
dinner-party
fall-pumpkins
hearty-pumpkin-soup

fall-dinner
happy-pup

HEARTY PUMPKIN SOUP RECIPE

ingredients
  • Small pumpkins (for serving)
  • 1 ½ (15 oz) Can Pumpkin Puree (or 1 medium pumpkin)
  • 3 cups chicken
  • 1 teaspoon ground cinnamon
  • ½ teaspoon ground cumin
  • ½ teaspoon ground nutmeg
  • 1 teaspoon allspice
  • ¼ teaspoon cloves
  • 2 ½ teaspoons salt
  • ¾ teaspoons ground pepper
  • 2 tablespoons butter
  • 1 tablespoon olive oil
  • 2 large onions, chopped
  • 4 cloves garlic, minced or pureed
  • 1 Yukon gold potato, peeled and diced
  • 4 cups chicken stock
  • ½ heavy cream
instructions
  1. Preheat Oven to 375 degrees
  2. Prepare small, serving pumpkins by cutting off the top and scooping and cleaning the insides. Then prepare the larger, cooking pumpkin preserving the insides to use in the soup.
  3. In a small bowl, combine spices with ½ teaspoon of salt and ¼ teaspoon of pepper.
  4. Sprinkle this mixture into the serving pumpkins. Roast pumpkins (tops on) for 30 minutes or until tender. Set aside.
  5. Meanwhile, prepare the soup. In a dutch oven, heat butter along with olive oil over medium high heat. Add onions and remaining salt and pepper. Cook until onions softened, about 5 minutes. Add garlic and cook for 1 minute, careful not to burn. Add diced potato, pumpkin, chicken, stock and bring to a simmer. Reduce heat and simmer until the potatoes are soft.
  6. Ladle soup into each small pumpkin, and serve.